Smart formatting for better compatibility between OpenOffice.org and Microsoft Office
Today I am going to share with you all about how to format your openoffice document , so that when some one else open it with Microsoft Office , the format of the document will be preserve.
Open Source Tips:
Smart formatting for better compatibility between OpenOffice.org and Microsoft Office
http://searchopensource.techtarget.com/tip/1,289483,sid39_gci1186330,00.html
Smart formatting for better compatibility between OpenOffice.org and Microsoft Office
I'm going to talk about the backbreaking labor of helping someone move and a seemingly unrelated topic, OpenOffice.org -- Microsoft Office compatibility. The two word processors are actually surprisingly similar; this article will show how doing things through the program features, rather than manually, helps you create documents that convert better between office suites. Plus, formatting is a whole lot easier than moving your buddy's 54-inch TV up three flights of stairs.
Think about the last time you helped someone move.
The boxes were probably labeled something like Kitchen or Bathroom. That's normal, right? Makes sense. You picked up a box, figured out where the kitchen was, and put it somewhere in the kitchen.
The thing is, the word Kitchen by itself really isn't enough, out of context, to tell someone where to put a box. You need to use your brain and eyes to enter the house, and you need to use your knowledge of what a kitchen looks like in order to know where to put the box. This is, of course, not difficult to do. I'm just pointing out that there's some interpretation going on, and the interpretation works well. The word Kitchen is not an absolute description of exactly where to put the box.
The instructions don't say, "Go in the door 12.5 feet, turn right, go nine feet, put box on a level surface 32 inches above floor." The boxes don't usually say any thing as specific as, "Second drawer from the right." Each spatula isn't labeled something like, "Put this 1.5 inches from the left side of the second drawer from the right."
If the instructions did have explicit, detailed instructions for where to put each spatula, but the specified drawer was a little too small, then even if the instructions were good and you followed them accurately, you've still got spatulas spilling over onto the floor.
Basically, you just want to put the objects somewhere in the new house that makes sense, not adhere rigidly to rules that goof things up.
What this means for inter-Office-Suite compatibility
When you use very specific formatting like tabs to indent text and carriage returns to switch to the next line, it's like trying to control exactly where your spatulas are supposed to go in the new house. No two office suites are alike, and the more manual, highly controlled items you have in your document, the more likely the formatting will get messy when you go from one office suite to another. But if you use the formatting capabilities to indent and add spacing--well, that's more like just labeling a box Kitchen and putting the box somewhere that makes sense.
The formatting tips in this article will also give you more professional-looking documents that are easier to update when the content or formatting rules change.
Use formatting rather than carriage returns for spacing between paragraphs
Most people would agree that the first illustration looks bad, and the second one looks good.


How do you get that nice space between the paragraphs? Many people do it by pressing Return and adding a blank line between the two.

But this will cause you lots of problems down the line.
Carriage returns are treated many different ways in different office suite programs. There are different rules for whether to send them to the next page or to keep them with the current paragraph, how much space they take up, etc. This can give you unpredictable results.
Also, what if you want to have a little less space between paragraphs--let's say you have a bulleted list where it looks nicer to have just a half line? It's a more professional look, but harder to do manually. You could reformat every blank line to have a six-point font, but that's a lot of work.
Some office suites, templates or even e-mail programs will automatically put spaces below the paragraphs, and then you'd need to remove all the extra carriage returns. Even with search and replace, that's a lot of unnecessary work.
Plus, hitting Return after every paragraph isn't really hard work, but it's an extra step you don't have to do, and it adds up after 10 or 100 pages.
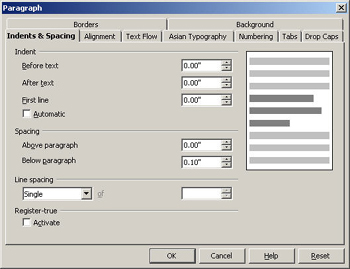
What you want to do, to make your document as professional-looking as possible and to minimize formatting problems between office suites, is to add the space between paragraphs with formatting rather than an extra empty paragraph. Click in the paragraph, choose Format > Paragraph, click Indents and Spacing, and put the spacing you want in the Below Paragraph field. .08 or .10 of an inch is usually good, but fiddle with it and see what you like. Click OK. Or you can just use the built-in Text Body style in Writer. Here's the formatting window.
With this approach, your paragraphs look like this.
Indent text using the indent formatting, not Tab and Return
It's quicker to just press Tab if you want to indent some text. But that's manual formatting and can break much more easily when you switch to a different computer or office suite. In addition, if you want to indent the whole paragraph, then you need to press Tab, then press Return to go to the next line, and so on, which is going to cause huge headaches if you need to change the content, the margins or basically anything else. It will also break much more easily if someone opens it in another office suite and settings for fonts, margins, etc. are the least bit different.
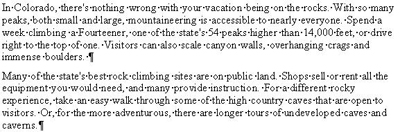
Here's a piece of text with the Tab/Return approach to formatting, in the original document (Writer), and opened in Word where the same font wasn't available.
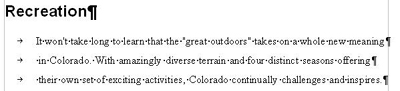

Here's the same text, but indented correctly using formatting, in Writer and in Word--without Tab or Return. The wrapping is different in Word since the original font still isn't available, but it looks fine.


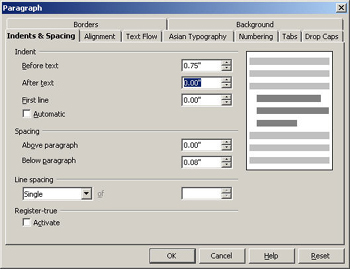
To indent a paragraph using formatting, click somewhere in the paragraph and choose Format > Paragraph. In the Indents and Spacing tab, just type the indent you want in the Before Text field and click OK.
You can also drag the small hourglass-like icon to indent the current paragraph or paragraphs.
Don't mix default tabs and standard tabs
Default tabs are what you have, usually at half-inch intervals, if you just press Tab. Standard tabs are what you get if you click on the ruler at a specific spot, specifically applying formatting to say what tabs you want. When you create a standard tab, all the tabs to the left of it just disappear. That, of course, could goof up your formatting if you were using default tabs.
Here's a document using default tabs and a picture of what happens when you apply a standard tab.


Default tabs can also be risky if the person you're giving the document to changes the default tab settings.
My message here is: Don't use default tabs. Use standard tabs, which you can apply by clicking on the ruler, or choose Format > Paragraph to open the tab formatting options.
Leave a little room for changes when you create or reformat documents and templates
When I open documents that have formatting problems, I see lots of Tabs and Returns, plus text that's too close together and doesn't allow for the possibility of different fonts or margins. When you create your OpenOffice.org templates, do so with the idea that they'll be transferred to Microsoft Office or another office suite and could need some room to adjust. Give them a little leeway; don't pack the text together too closely vertically or horizontally; use biggish margins; don't use tiny fonts; and so on. Just as you wouldn't pack your tightest jeans when you went home for Thanksgiving, give your documents a little room for variations between office suites.
Preserve all your formatting in styles
Choose Format > Styles and Formatting, and create styles rather than re-applying formatting each time you need it. Styles are a big topic, too big to be added to this article, but use the online help to get started. I also have a few blogs on styles at http://openoffice.blogs.com/openoffice/styles/index.html.
If you create a document using styles in Writer and it opens oddly in Word, then instead of trying to change the formatting for the whole document, you just change the style definition. It's much easier to change three things in one place than to change three things in 139 places.
The bottom line: The better and more flexible your formatting is, the better your documents will convert between office suites
Good formatting means using the formatting tools; working with the program, not against it and leaving it some room for error. Treat your office suites with trust and respect, and they'll do right by you, too.
Check out the compatibility settings, too
Choose Tools > Options > OpenOffice.org Writer > Compatibility and play with the features there. They're covered in the sample chapter included with this article.
Click the link to see a preview draft chapter of Solveig's upcoming OpenOffice.org 2.0 book. The chapter covers working with Microsoft Office documents and users, including specific compatibility settings you can work with for increased compatibility.
DISCLAIMER: Our Tips Exchange is a forum for you to share technical advice and expertise with your peers and to learn from other enterprise IT professionals. TechTarget provides the infrastructure to facilitate this sharing of information. However, we cannot guarantee the accuracy or validity of the material submitted. You agree that your use of the Ask The Expert services and your reliance on any questions, answers, information or other materials received through this Web site is at your own risk.
posted by 阿馮 at Thursday, May 04, 2006
![]()

0 Comments:
Post a Comment
<< Home